Publish an HTML landing page on Cloudflare Workers
Host your HTML landing page on your own domain with Cloudflare Workers and connect the RoyLead tracker to collect clicks and leads.
Updated on June 24, 2026
Got a landing page in HTML (hand-made, built with Claude, ChatGPT or a page builder) and want it online on your own domain? With Cloudflare Workers you publish it for free in minutes, and with the RoyLead tracker you collect clicks and leads automatically. This guide walks you step by step from a folder of files on your computer to a live, tracked landing page.
💡 Everything stays yours: the domain is yours, the hosting is on your Cloudflare account (the free plan is more than enough), and RoyLead only adds the tracking.
What you need ready
Before you start, gather three things:
- A domain — bought wherever you like (Namecheap, GoDaddy, etc.). It doesn't need to be on Cloudflare yet: we move it there in Step 2.
- Your HTML landing page, inside one folder on your computer. It typically contains:
- the
index.htmlfile (the page) - an
images/folder with the images
- the
- A RoyLead account where you're logged in.
💡 Don't have the landing page yet? Create it with AI in no time: Create an HTML landing page with Claude or ChatGPT ↗. Come back here with the folder ready.
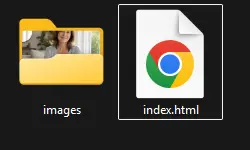
💡 All the RoyLead tracking code goes inside
index.html(we'll see it in Step 4): no separate config file needed.
💡 Keep all files inside a single folder: that's the one we'll upload to Cloudflare in Step 5. If the images are in an
images/subfolder, make sure the HTML references them with the right path (e.g.images/photo.jpg).
Prepare the domain (two things)
Your domain needs to be ready on two fronts. These are two guides of their own — do both, then come back here:
- On Cloudflare — the domain must be managed by Cloudflare (nameservers pointed), so we can host the landing page on it. → Add a domain to Cloudflare ↗
- On RoyLead — the domain must be added and verified in RoyLead, so leads and conversions get attributed correctly. → How to connect a new domain ↗
💡 The two fit together nicely: the verification record RoyLead asks for (a TXT) is added right in Cloudflare's DNS, where you now manage the domain. For the site type choose HTML / Custom.
💡 If the domain is already active on Cloudflare and verified in RoyLead, skip ahead to Step 3.
Come back here once the domain is Active on Cloudflare and Verified in RoyLead.
Create the landing page in RoyLead and grab the keys
Here we grab the two values the tracker will use: the Landing Page ID and your API Key.
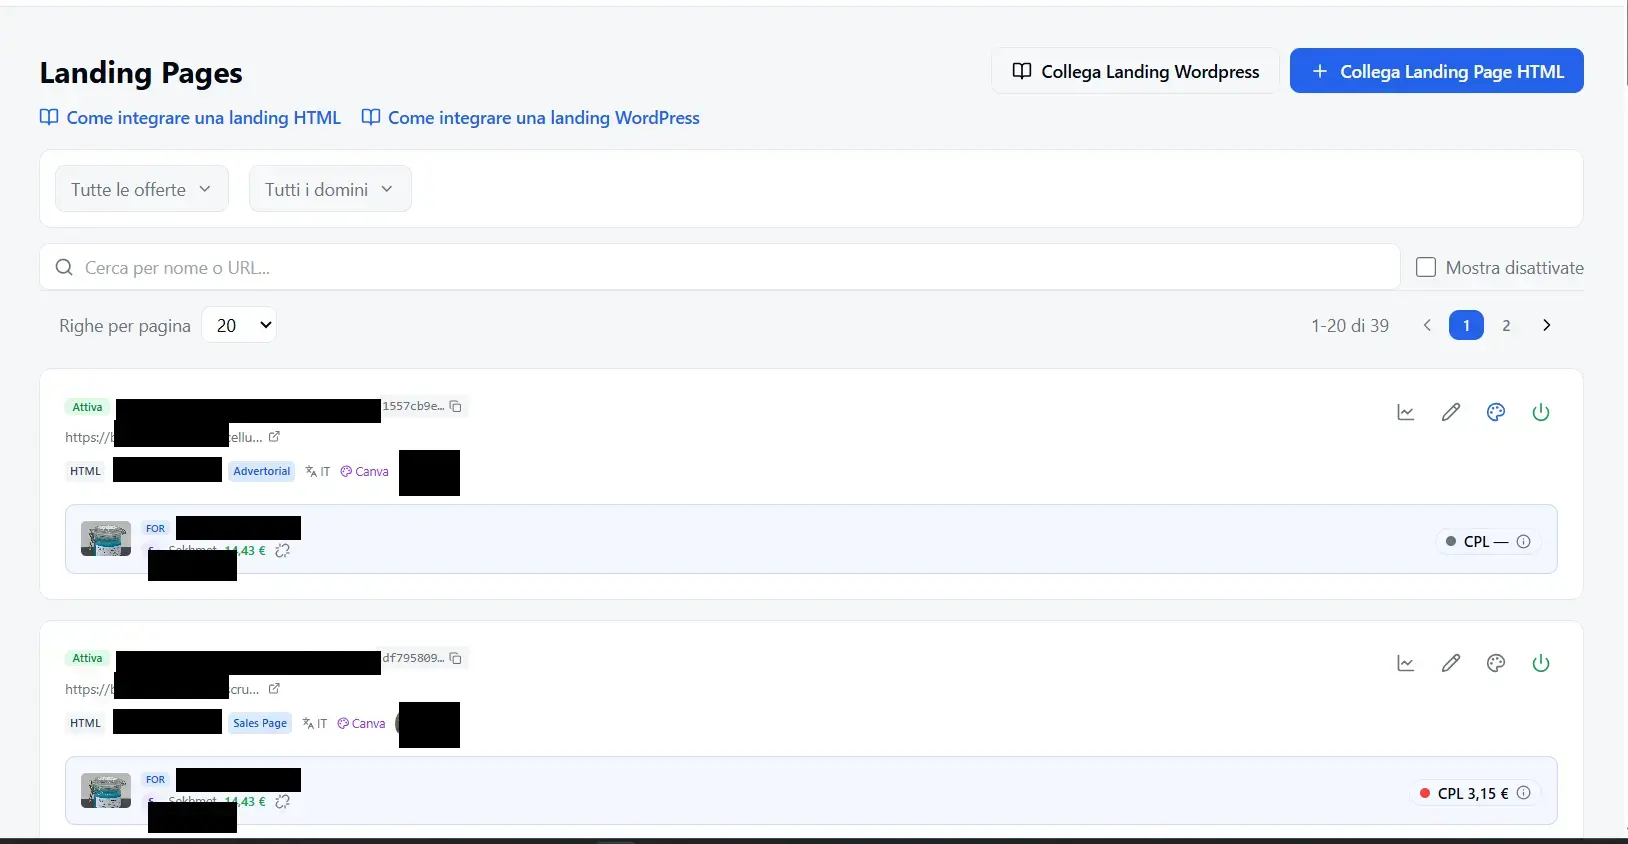
- In the menu go to Landing Pages and click Connect HTML Landing Page.
- Fill in Name (e.g. "Summer Promo") and URL (the path it will have on your domain, e.g.
https://yourdomain.com/promo), select the domain and save. - In the list, next to the landing page, click the copy icon near its ID to copy the Landing Page ID. Keep it aside.
- Go to Settings → API Key and copy the key with the copy icon next to it (or click Regenerate API Key to generate a new one).
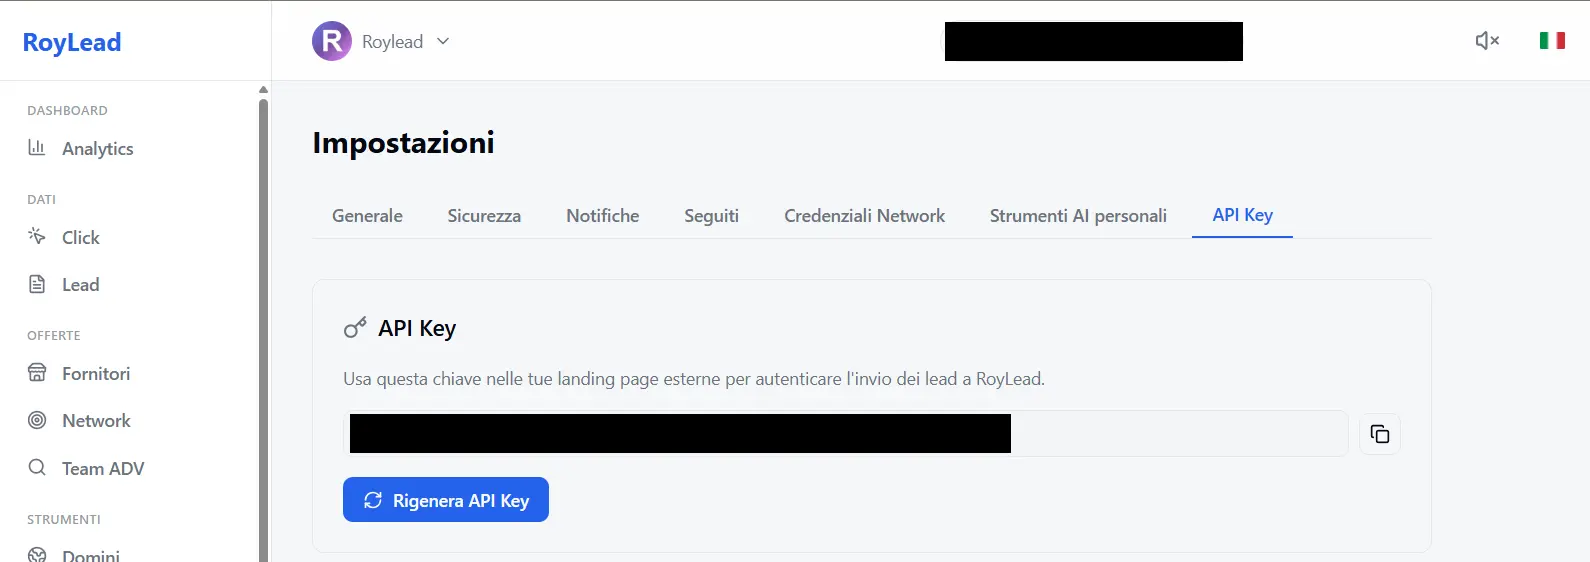
🔒 The API Key identifies your account: don't share it. If you regenerate it, you'll need to update it in the landing pages that use it.
By the end of this step you have two things in hand: the Landing Page ID and the API Key. You need both in Step 4.
Paste the tracker into `index.html`
This is the only piece of "code", but it's just copy-paste. Open index.html with a text editor (VS Code, Notepad++, even Notepad all work).
1. Where you want the form → put this where the form should appear (in several spots on the page too):
<div class="lp-form-container"></div>
The tracker draws and styles the form itself: you just place the container, wherever you prefer.
2. Right before </body> → paste the tracker block and fill it with the data from Step 3:
<!-- RoyLead Tracker -->
<script>
  window.RoyLeadConfig = {
    captureUrl: "https://capture.roylead.com",
    apiKey: "YOUR_API_KEY",
    landingPageId: "YOUR_LANDING_PAGE_ID",
    thankYouPage: "https://yourdomain.com/path/thank-you"
  };
</script>
<script src="https://capture.roylead.com/tracker.js"></script>
3. Save the file.

⚠️ Three things to watch out for: replace
YOUR_API_KEYwith the key from Step 3,YOUR_LANDING_PAGE_IDwith the ID copied from the list, and remember the comma at the end of each line inside the braces (except the last one).
💡 If your
index.htmlalready has other scripts (cookie banner, pixels, etc.), no problem: what matters is that the RoyLead Tracker block is before</body>. We'll prepare the page set inthankYouPagein Step 7.
Create the Worker and upload the files to Cloudflare
Now we put the files online on your Cloudflare account. No terminal, no GitHub: you just upload the folder.
- On dash.cloudflare.com, in the left menu open Compute (Workers) and click Create.
- On the "Ship something new" screen choose the last option: Upload your static files.
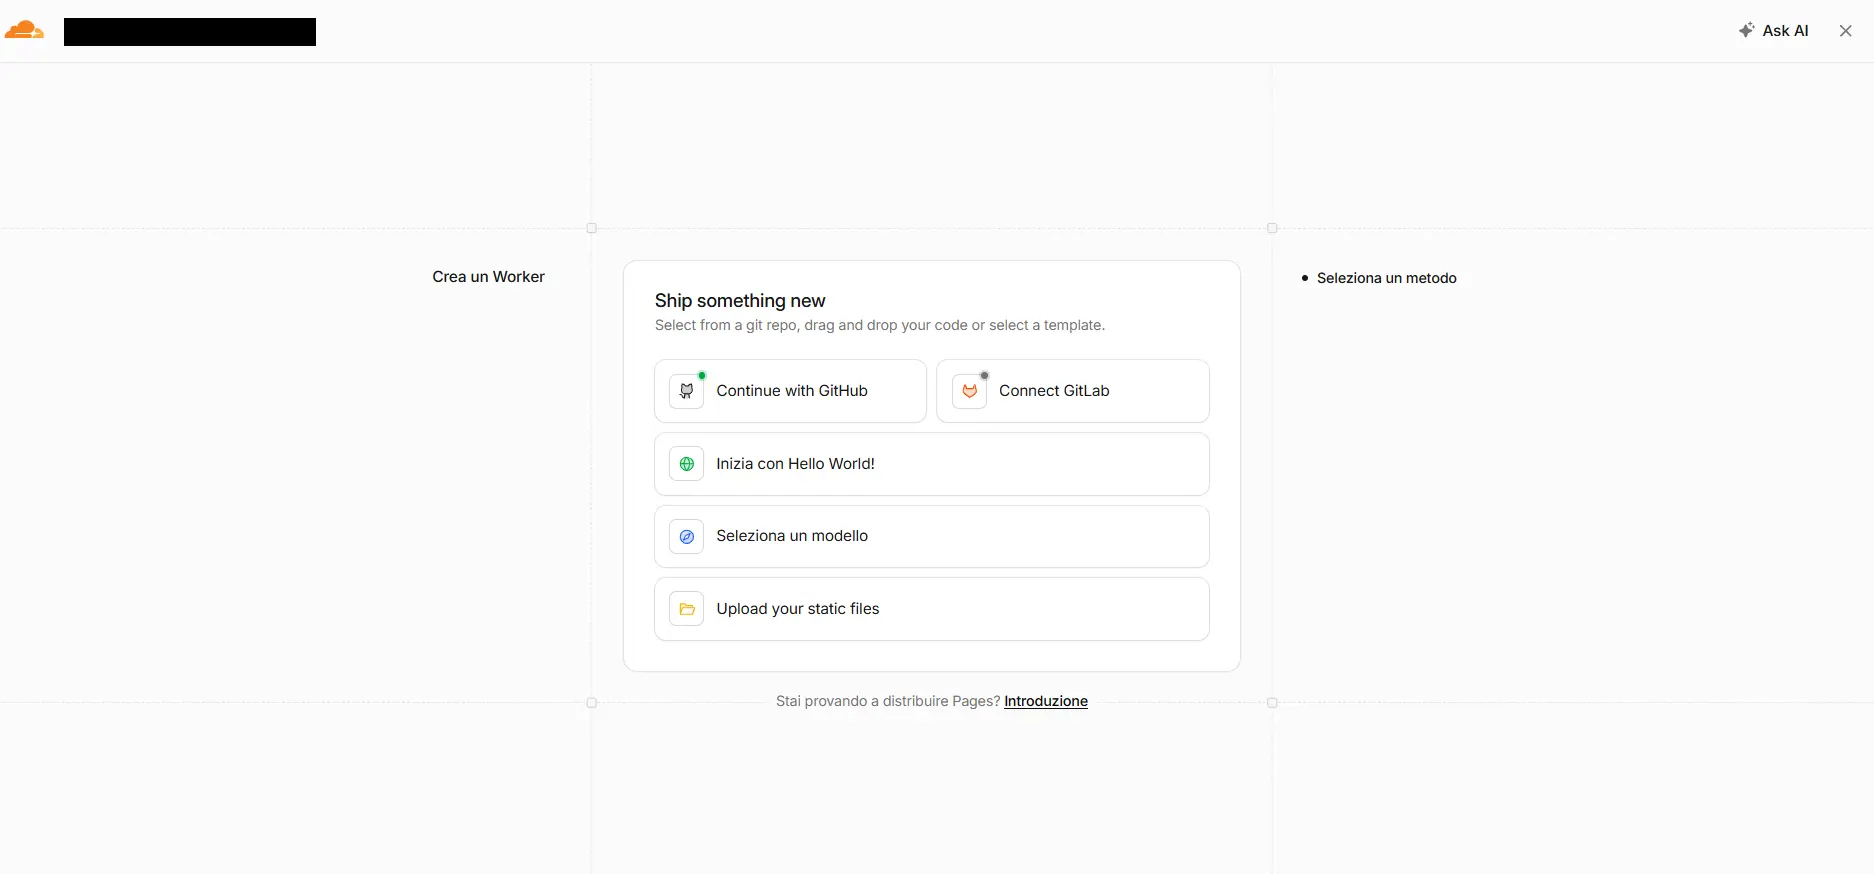
- The "Upload and deploy" screen opens. In the box click folder (or drag and drop) and select the entire folder of your landing page — so
index.htmland theimages/subfolder are uploaded together, with the right structure.
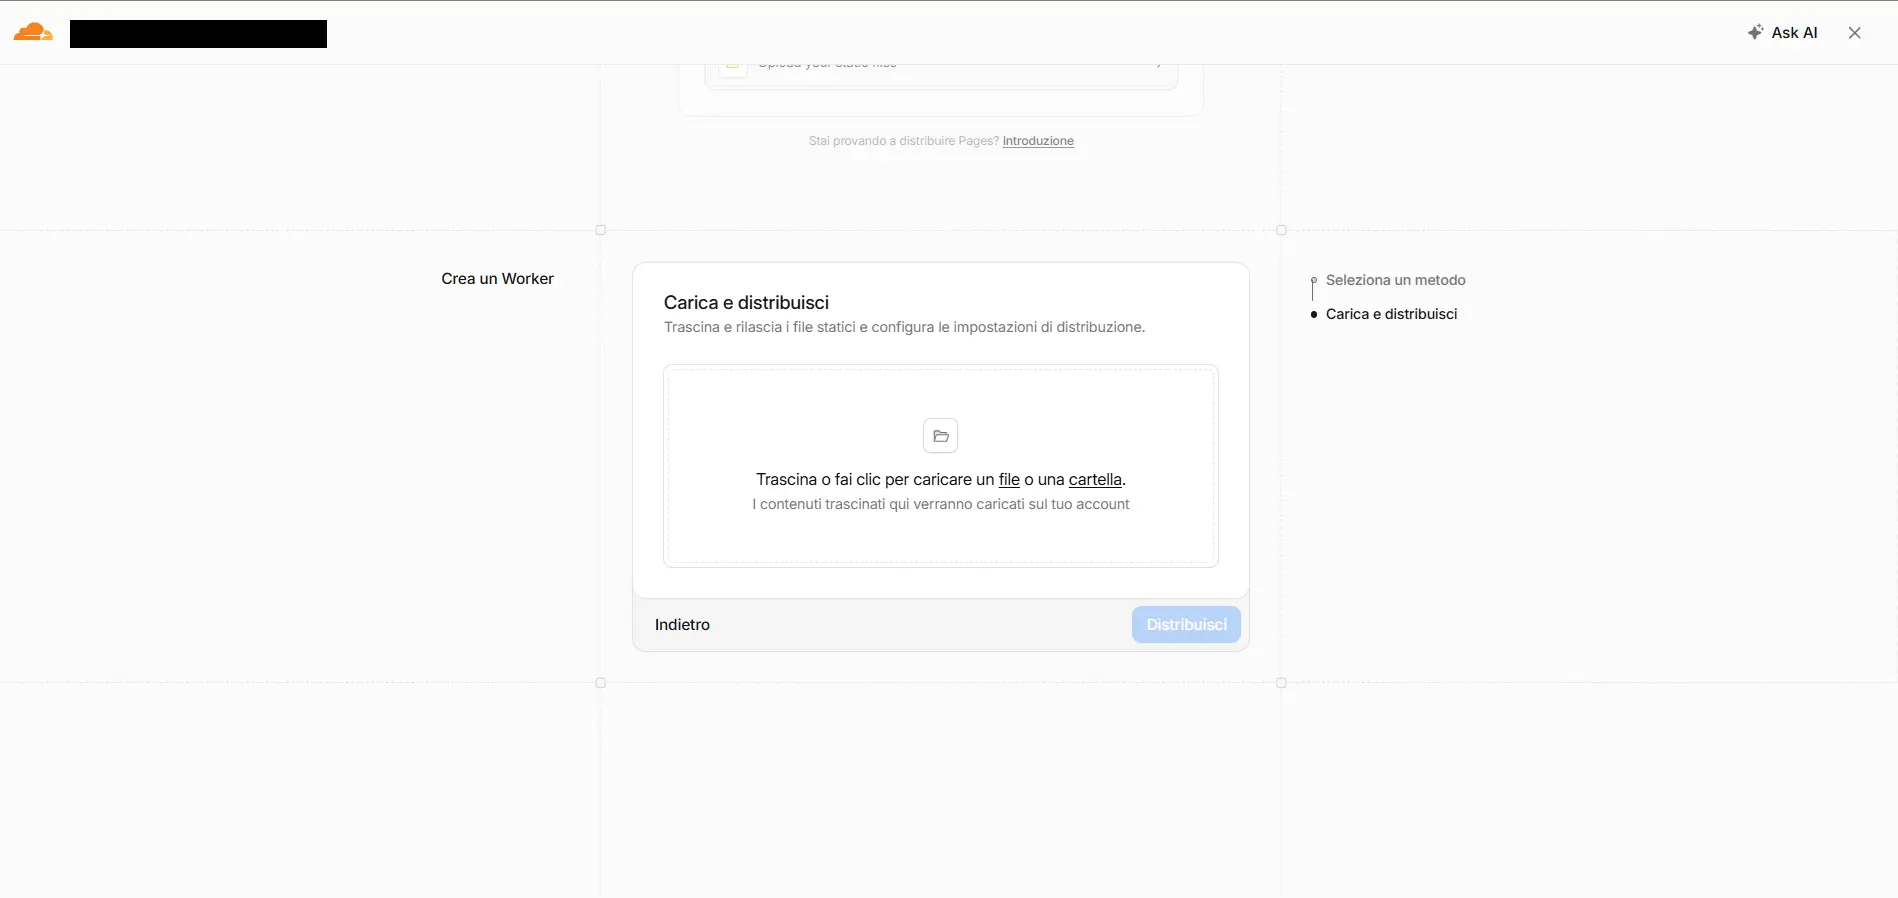
⚠️ Upload the folder, not just
index.html: otherwise the images (which live inimages/) don't get uploaded and the page shows up without photos.
- Cloudflare lists all uploaded files (
index.html+ theimages/folder) and suggests a ready-made Worker name: you can leave it as is. Click Deploy.
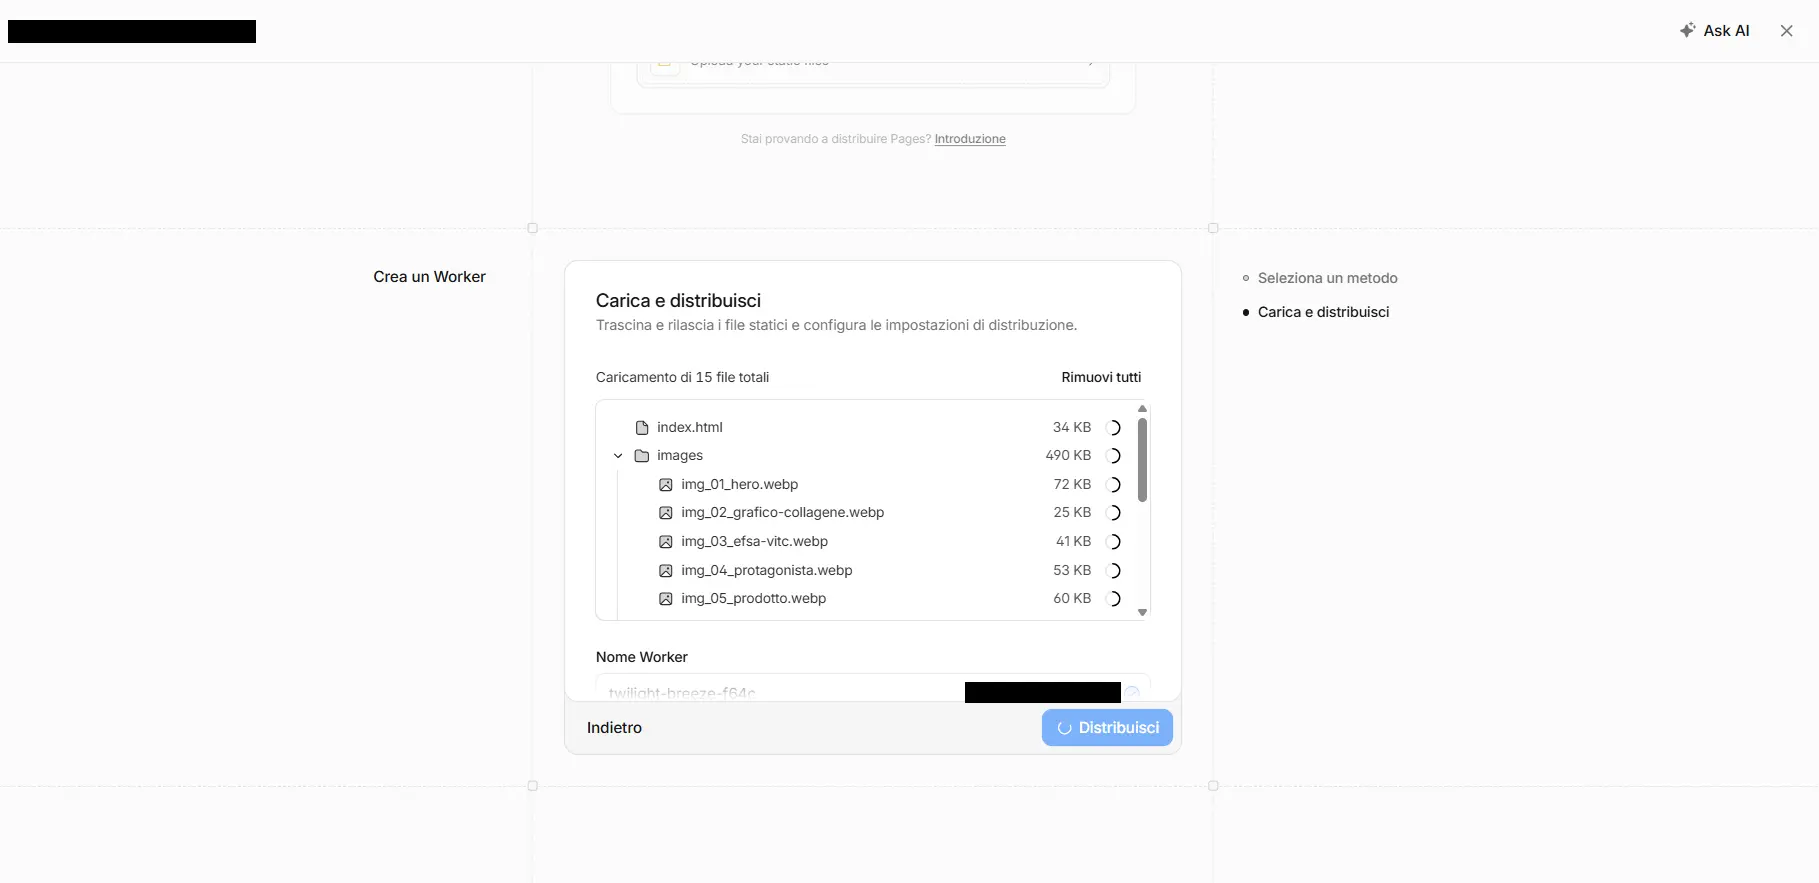
- In a few seconds the landing page is online at a Cloudflare address like
worker-name.your-subdomain.workers.dev. You can open it with Visit to check it looks right.
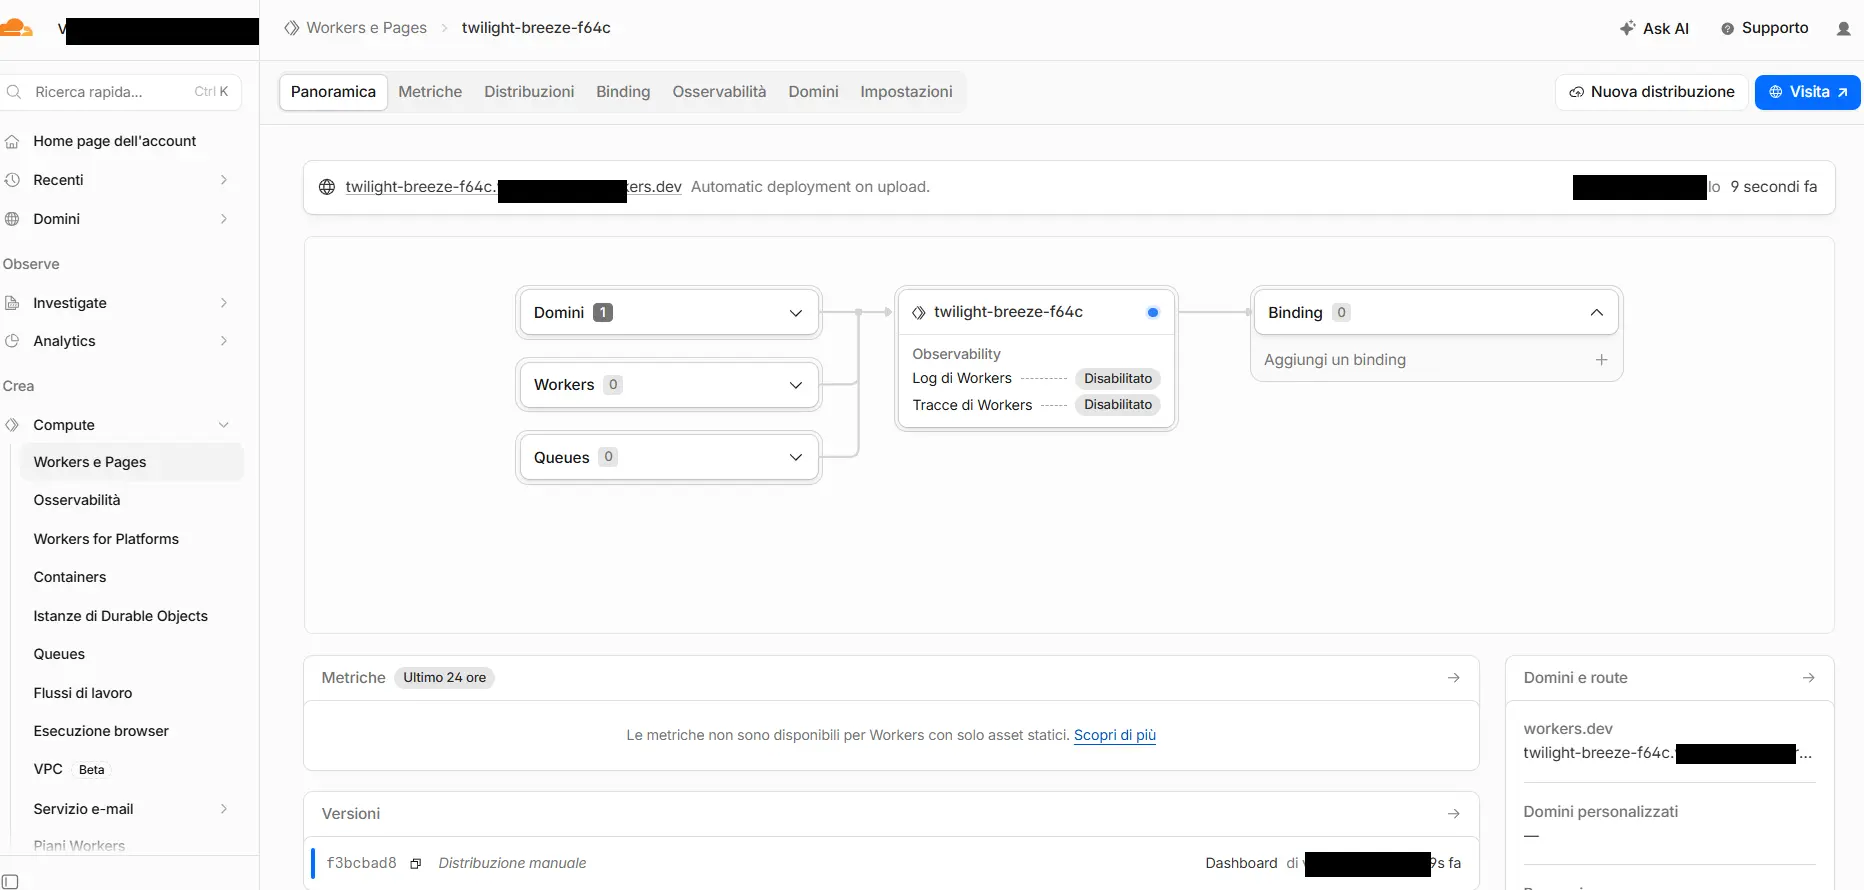
💡 This
.workers.devaddress works but it's not your domain. In Step 6 we connect your real domain.
Connect your domain to the Worker
Now let's serve the landing page on your address. On the Worker's page open the Domains tab.
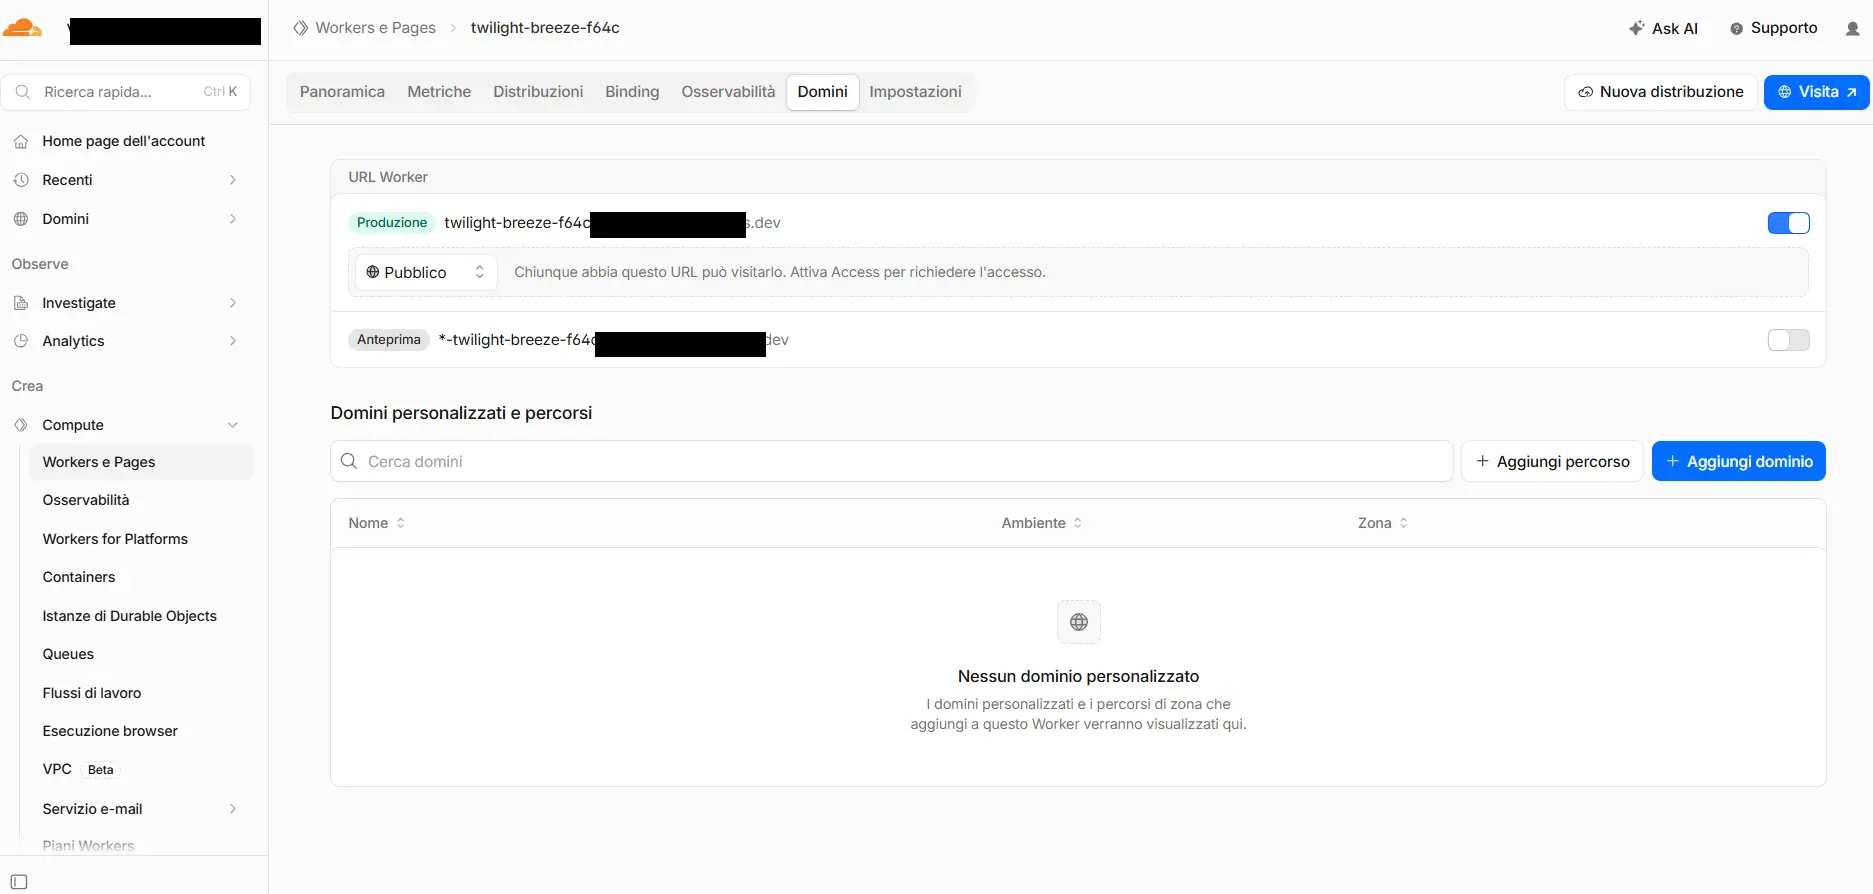
Under "Custom domains and routes" click Add domain.
💡 Use Add domain (custom domain), not "Add route": the custom domain serves the landing page cleanly, with the images working right away.
The "Connect domain" window opens with the list of your domains on Cloudflare. Choose the domain you want to publish on.
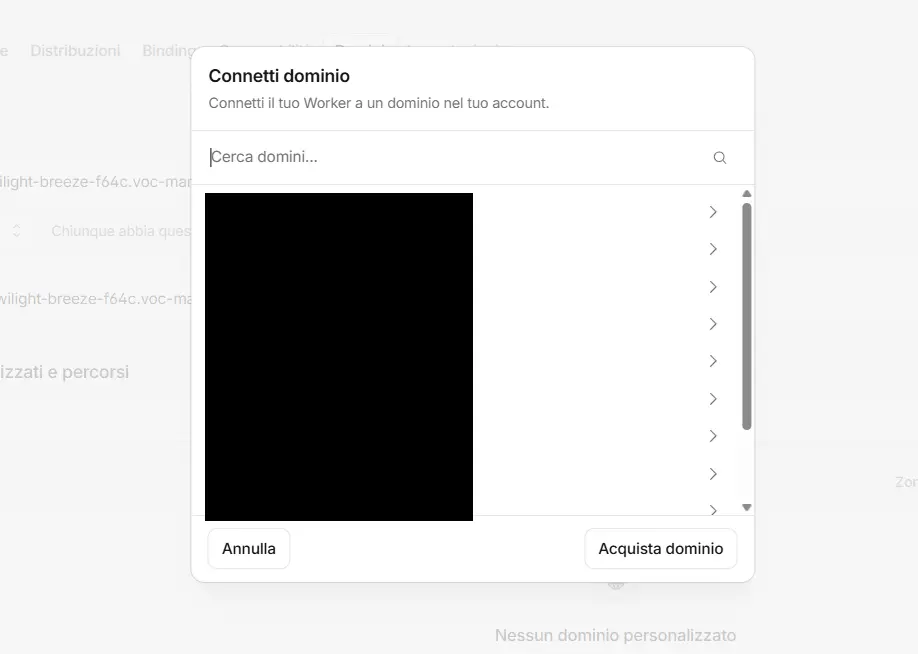
💡 Tip: connect the landing page to a dedicated subdomain, e.g.
promo.yourdomain.com, rather than the bare domain. That way you can publish many landing pages on the same domain (one per subdomain:promo.,sale., etc.) and each stays independent.
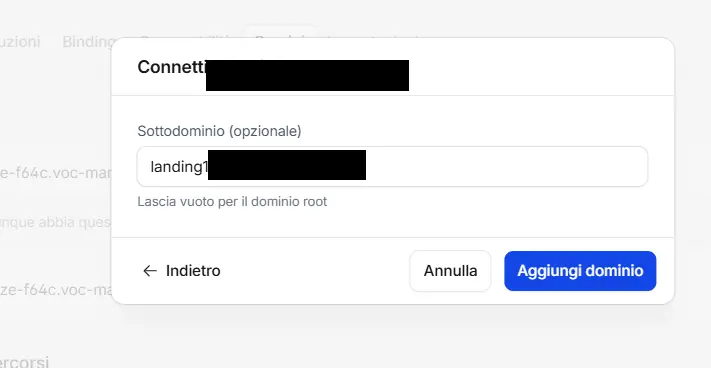
The "Connect to yourdomain.com" window opens: in the Subdomain (optional) field type the subdomain you want (e.g. promo → becomes promo.yourdomain.com). If you leave it empty, it uses the bare domain. Then click Add domain.
Done: the domain appears in the "Custom domains and routes" list with the Production environment. Within a few minutes (the time for the SSL certificate) your landing page is live on your address.
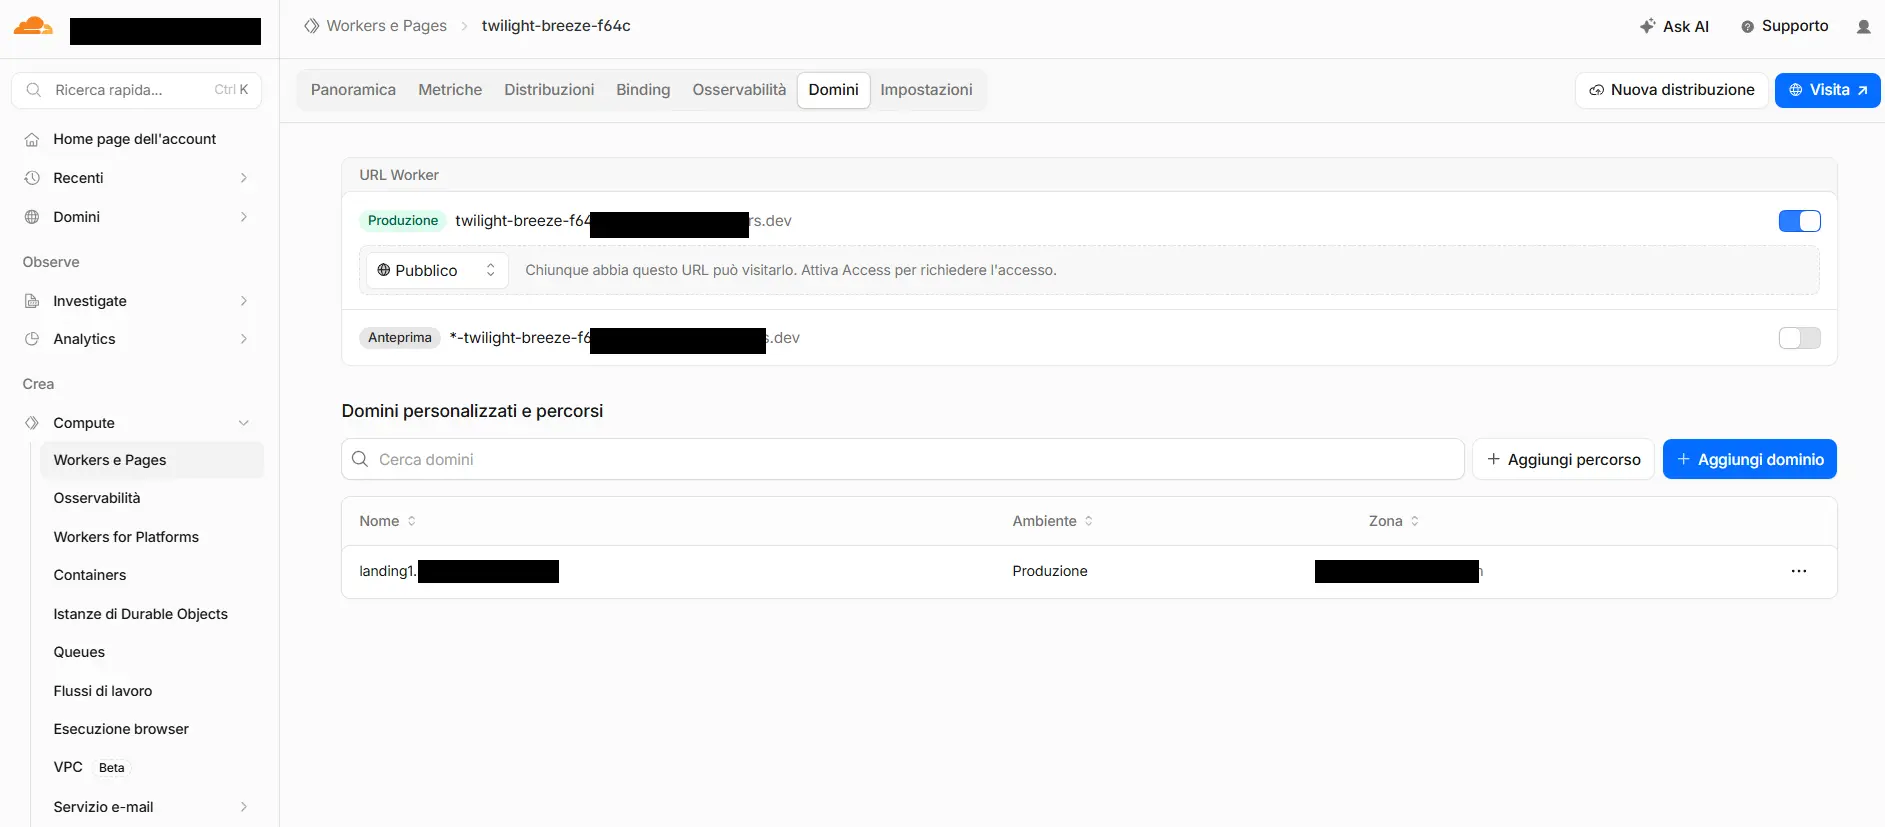
💡 Your landing page's address is now the subdomain (e.g.
https://promo.yourdomain.com). Keep it in mind: you need it for the thank-you page (Step 7) and for testing.
Thank-you page
After the form is submitted the user must land on a "Thank you" page: it's needed for the user experience and because RoyLead uses that URL as the conversion reference. Since you host the files, you put the page in the same folder:
- Create a
thank-you.htmlfile in the landing page folder (a simple page is enough: "Thanks! We'll contact you shortly"). - In the tracker block inside
index.html(Step 4) setthankYouPageto the real address on your subdomain:
thankYouPage: "https://promo.yourdomain.com/thank-you.html"
- Re-upload the updated folder to the Worker: from the Worker's page click New deployment → Upload your static files and drag the folder again (now with the updated
index.html+thank-you.html).
⚠️ Without
thankYouPageset to a real page, after submitting the user ends up on an address that doesn't exist (404). Always put a real page of yours.
Final check
Almost there. Let's confirm everything works:
- Open the landing page on your address (e.g.
https://promo.yourdomain.com). To test tracking, add a parameter to the URL, e.g.?fbclid=test123&utm_source=facebook. - Check that the images show and that the form appears where you placed the
<div class="lp-form-container">. - Fill in and submit the test form: you should land on the thank-you page.
- Go to RoyLead → Leads: the test lead should appear there (with the campaign parameters, if you added them to the URL).
💡 If the lead arrives and you see the parameters in Leads, the integration is complete. From here on, you just change the files and re-upload the folder (Step 7, point 3) every time you update the landing page.
Troubleshooting
- The page shows without images → you uploaded only
index.htmlinstead of the whole folder. Re-upload the complete folder (Step 5). - The form doesn't appear → the
<div class="lp-form-container"></div>is missing from the HTML, or the tracker block isn't before</body>(Step 4). - The lead doesn't arrive / "not authorized" → wrong
apiKey, or left asYOUR_API_KEY(Step 4). - After submitting I get a 404 page →
thankYouPagenot set or wrong address (Step 7). - The domain won't open → the SSL certificate can take a few minutes after connecting the domain (Step 6); try again shortly.
Ready to put this into practice?
Create your RoyLead account and start in minutes.