Connect RoyLead to your AI (MCP)
Manage RoyLead by chatting with your AI — domains, landings, pixels, leads, campaigns and creatives. Connect Claude.ai, ChatGPT, Claude Code, Perplexity or Lovable.
Updated on July 26, 2026
RoyLead connects to Claude, ChatGPT, Perplexity and Lovable through MCP (Model Context Protocol): from a chat you can ask the AI to manage your account — create domains and link landing pages, read your leads, check campaign ROI, generate creatives with AI and more. The assistant acts with your permissions, exactly as you would from the dashboard.
The MCP server is the same for every client — only the way you connect changes:
- Claude.ai (browser, desktop app, phone) → secure login, no key to paste (Option A)
- ChatGPT (browser and app) → secure login, no key to paste (Option B)
- Claude Code / Claude Desktop (on your computer) → API Key (Option C)
- Perplexity → API Key (Option D)
- Lovable → API Key (Option E)
💡 If you connect more than one assistant with an API Key (e.g. Claude Code and Perplexity), create a separate key for each one, with a recognizable name. Keys are free and let you revoke a single connection without touching the others — and the "last used" column tells you at a glance who is using what.
What you can do once connected
- Domains: create a domain, get the TXT record, verify DNS, manage settings.
- Landing pages: create them, link them to a domain and to an offer.
- Leads: read your leads (team owners/admins see the whole team's, operators see only their own).
- Ad campaigns: read accounts, ad sets, ROI and Meta insights.
- AI creatives: generate images, browse the gallery and presets.
- Feed: read community posts and comments.
- Profile and team: read and update settings (name, language, notifications, team settings if you're an owner/admin).
💡 Sensitive actions stay out of the chat for safety: password/email changes, 2FA, billing/payments, deleting a team and removing members are only done from the dashboard.
Option A — Claude.ai (browser, app, phone)
On Claude.ai you connect with a secure login: no key to paste.
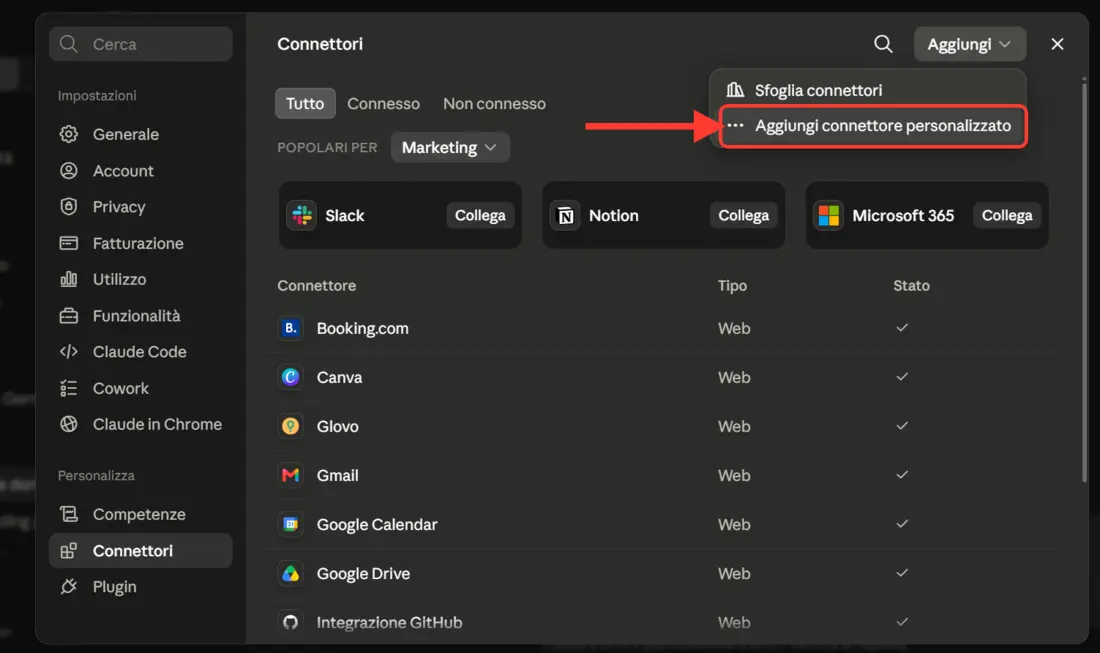
Step 1 — Open Connectors
On claude.ai go to Settings → Connectors and choose Add custom connector from the Add menu at the top right.
Step 2 — Paste RoyLead's address
As the MCP server URL, enter:
https://api.roylead.com/api/v1/mcp
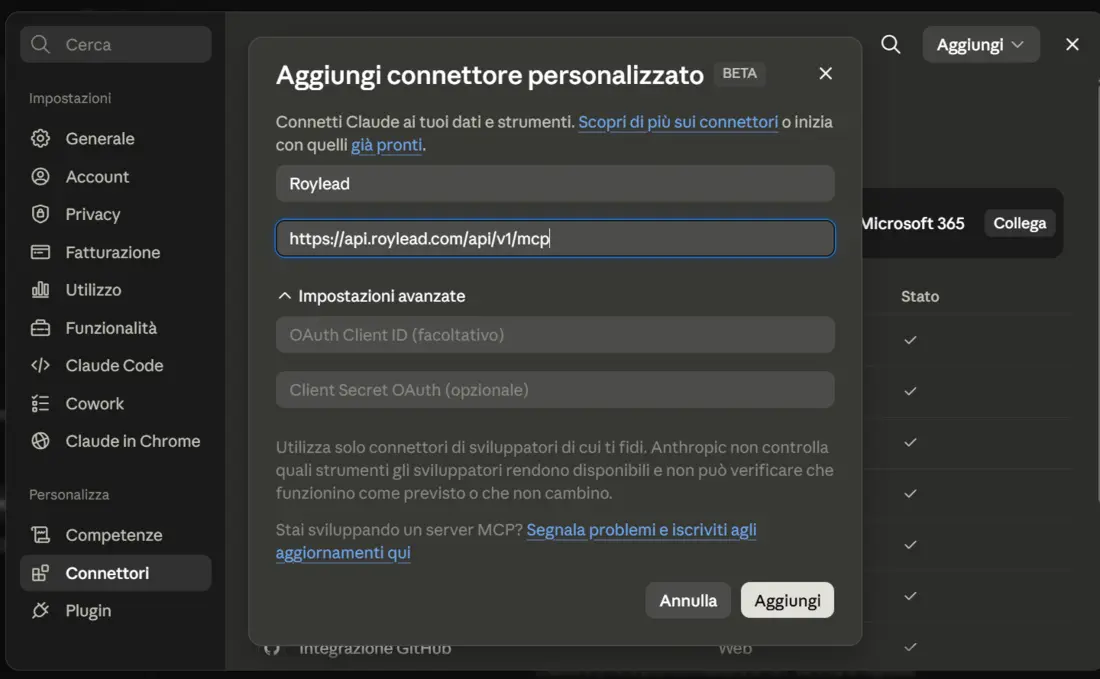
The name is up to you (e.g. "RoyLead"); the advanced settings (OAuth Client ID / Secret) stay empty. Confirm to add the connector.
Step 3 — Authorize access
Claude will open RoyLead's page: sign in with your account (if you haven't already) and you'll see a consent screen telling you which application is requesting access and where it will be redirected. Check the address is Claude's, then click Authorize.
Done: the connector shows as connected and you can start asking Claude to work on RoyLead.
💡 You can revoke access anytime by removing the connector in Claude.ai. Each authorized session is independent.
Option B — ChatGPT (browser and app)
ChatGPT connects with a secure login too, no key to paste: same mechanism as Claude.ai. Custom connectors live under developer mode.
Step 1 — Turn on developer mode
On chatgpt.com open Settings → Connectors (recent versions call them Apps), section Advanced, and switch Developer mode on.
💡 Available on Plus, Pro, Business, Enterprise and Edu plans. On Business and Enterprise an administrator can turn it off for the whole workspace — ask whoever manages the account.
Step 2 — Create the connector
Still under Settings → Connectors, choose Create and fill in:
- Name: RoyLead (anything you like)
- MCP server URL:
https://api.roylead.com/api/v1/mcp - Authentication: OAuth
- Tick the box confirming you trust the provider
Step 3 — Authorise access
ChatGPT sends you to the RoyLead page: sign in and confirm with Authorise, exactly as with Claude. You land back in ChatGPT with the connector linked.
Step 4 — Switch it on in the chat
In a new conversation press + → More → Developer mode and enable the RoyLead connector. From there you can ask it about your data.
💡 To remove access, delete the connector in ChatGPT: it is an OAuth link, so there is no key to revoke.
Option C — Claude Code / Claude Desktop (on your computer)
Here the connection uses a dedicated API Key with the "MCP" scope.
Step 1 — Create the key in RoyLead
Go to Settings → API and create a new key with the MCP scope.
Give it a recognizable name (e.g. "Claude Code laptop") and copy the key (rl_...). You can also reveal it again later with the eye icon.
💡 Use an MCP-scoped key, not the WordPress plugin one: they're deliberately separate, so if one is compromised the other stays safe.
Step 2a — Claude Code (terminal)
In a terminal, run (replace the key with yours):
claude mcp add roylead --scope user --transport http https://api.roylead.com/api/v1/mcp --header "x-api-key: rl_YOUR_KEY"

--scope user makes the connection available in any folder. Then restart Claude Code (MCP servers load at startup) and verify with:
claude mcp list
roylead should appear as connected.
Step 2b — Claude Desktop
Alternatively, in Claude Desktop's MCP configuration add:
{
  "mcpServers": {
    "roylead": {
      "type": "http",
      "url": "https://api.roylead.com/api/v1/mcp",
      "headers": { "x-api-key": "rl_YOUR_KEY" }
    }
  }
}
Save and restart Claude Desktop.
💡 To remove access later, revoke the key from Settings → API: the connection stops working instantly, without touching your other keys.
Option D — Perplexity
Perplexity also connects with an API Key, from its connectors panel.
Step 1 — Create the key in RoyLead
Go to Settings → API and create a new key with the MCP scope, dedicated to Perplexity (e.g. named "Perplexity").
Copy the key (rl_...).
💡 If you already have a key for Claude Code, don't reuse it: create a new one. That way you can revoke Perplexity without disconnecting Claude (and vice versa).
Step 2 — Add the connector in Perplexity
In Perplexity go to Settings → Connectors and choose Custom connector (type Remote). Fill it in like this:
- Name: RoyLead (up to you)
- MCP server URL:
https://api.roylead.com/api/v1/mcp - Authentication: API Key → paste your
rl_...key - Transport: HTTP (Streamable HTTP)
Confirm and enable the connector: from that moment Perplexity operates on RoyLead with your permissions.
💡 To disconnect Perplexity, revoke its key from Settings → API: it stops working instantly.
Option E — Lovable
Lovable connects with an API Key too, as a custom MCP connector. Handy when you're building an app on Lovable and want the AI to read your RoyLead data (offers, leads, ROI) while it writes the code.
Step 1 — Create the key in RoyLead
Go to Settings → API and create a new key with the MCP scope, dedicated to Lovable (e.g. named "Lovable").
Copy the key (rl_...).
Step 2 — Add the connector in Lovable
In Lovable open Connectors, scroll to the bottom of the All view and pick the Custom card labelled MCP. Fill it in like this:
- Server name: RoyLead (up to you)
- Server URL:
https://api.roylead.com/api/v1/mcp - Authentication: Bearer token / API key → paste your
rl_...key
Confirm with Add server and test it by asking Lovable for some of your data (e.g. "What domains do I have on RoyLead?").
💡 In Lovable the connector only feeds the chat while you build: it doesn't ship with the app you publish, so your key is never exposed to the app's users.
💡 To disconnect Lovable, revoke its key from Settings → API: it stops working instantly.
Test that it works
Open a new chat with your assistant and try asking:
- "What domains do I have on RoyLead?"
- "Read me the guide on connecting a domain."
- "How many leads did I get this week?"
If it answers with your data, the connection is live.
Troubleshooting
| What you see | Cause | Fix |
|---|---|---|
| Connector errors on Claude.ai / ChatGPT / Perplexity / Lovable | Wrong address | Use exactly https://api.roylead.com/api/v1/mcp (with api., not app.) |
| No Create button among ChatGPT connectors | Developer mode off | Settings → Connectors → Advanced → Developer mode. On Business and Enterprise an administrator may have disabled it |
| The connector exists in ChatGPT but the assistant ignores it | Not switched on in the chat | In a new conversation: + → More → Developer mode, then enable RoyLead |
claude mcp list shows "failed" | Wrong URL or key | Check the URL and that the key has the MCP scope |
| "Unexpected content type: text/html" | You used app.roylead.com | The MCP lives on api.roylead.com, not the website |
| Perplexity or Lovable won't authenticate | Wrong key | Paste the full rl_... key in the API Key field and check it has the MCP scope |
| The assistant can't see the new tools | Session not restarted | Close and reopen the client (Claude Code/Desktop) or reload the page |
| An action is refused | Missing permission | Some actions are reserved for team owners/admins, or stay dashboard-only |
Need help?
If the connection won't start after checking the URL and key, contact support and mention where you're connecting from (Claude.ai, ChatGPT, Claude Code, Claude Desktop, Perplexity or Lovable).
Ready to put this into practice?
Create your RoyLead account and start in minutes.